Tag Archives: seal

Just What is “The Seal” Anyway?

“Pump 101 is down and going to the shop.”

“What’s the problem?  The seal?”

We use the word “seal” to mean many things.  I’m just as guilty as anyone.  Usually, when I say “seal”, I mean the seal ring assembly. But sometimes I mean the combination of the seal ring and mating ring components.  Other times, I mean the assembled seal cartridge.  Especially when with others, I’ll go along with the conversation and say “seal” instead of “sealing system”.  I should know better and do try to be more specific but old habits are difficult to break.

Below is an illustration of the way I try to think of a sealing system.

Auxiliary equipment includes coolers, reservoirs and even external circulating systems.

These days, the seal assembly usually means a cartridge assembly but it might mean the seal ring assembly.

Adaptive hardware consists of the sleeve, gland plate and various “adapters” that are necessary to fit a more or less standard seal ring and mating ring into the seal assembly and then into the pump.

And, no, that was not a lucky guess in the opening scenario.  Probably 60 to 80% of pump repairs are somehow related to the sealing system.

Hydrostatic Pressure Test

Apparently, the rules and guidelines for conducting a hydrostatic test on pressure vessels – including pumps – are about to be changed.  Perhaps those rules have already been changed and I’ve simply missed hearing about them.  I blame that on retirement.

The hydrostatic test is the way in which pressure vessels are tested for leaks.  The test involves filling the vessel with a liquid, usually water, and pressurizing it to the specified test pressure.  In my career, the rule for determining the hydrostatic test pressure has been to simply multiply the Maximum Allowable Working Pressure (MAWP) by 1.5.  That is, suppose a certain vessel has an MAWP of 600 psig; it would be hydrostatically tested at 900 psig.  Of course, there are other details such as the duration of the test, variations based on operating temperature, etc.  But basically, the hydrostatic test pressure has been 1.5 x MAWP for many years – certainly since the 1950s.  However, it has not always been that way.

Here’s an interesting little anecdote that I was told many years ago.  I may not have it quite right and, for all I know, it may not even be true, but here goes.  In the 1970s, I was told that very long ago, the practice was to test pumps at 2 x MAWP.  Perhaps this was because pumps are manufactured from castings.  Anyway, there was a pump standards meeting (perhaps this was even an early form of an API standards meeting) and a requirement was written to hydrostatically test pumps at 1.5 x MAWP.  After the meeting, the chief engineer for a major pump manufacturer was buying drinks for everyone at the bar.  Surprised by his generosity, a fellow committee member remarked that the 2x hydrostatic test must have been difficult.  “Not at all”, said the chief engineer, “In fact, I just increased all my pressure ratings by 33%!”  That is, pumps previously rated for 600 psig MAWP but hydrostatically tested at 1200 psig could still be hydrostatically tested at 1200 psig but then rated for 800 psig MAWP!

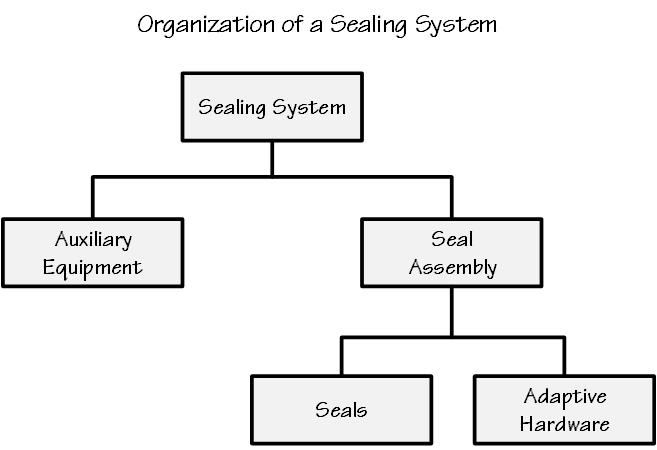
I’ve been told that the multiplication factor for determining the hydrostatic test pressure will be changed from 1.5 to 1.3 according to the ASME Pressure Vessel Code Section VIII.  Apparently this will be applied to both pumps and piping.  The same multiplier will probably be used for API 682 reservoirs such as are used with Piping Plan 52 and 53.  The pertinent 4th Edition clauses for reservoirs now read:

8.3.6.2.8 The reservoir is part of the pump piping system. Unless otherwise specified or required by local code, the reservoir shall be designed, fabricated, and inspected in accordance with ISO 15649 or ASME B31.3 using piping components.

8.3.6.2.9 If the reservoir is built entirely of piping components, ISO 15649 or ASME B31.3 can be applied and provides adequate design for the reservoir just as it does for the pump suction and discharge piping. It is the user’s responsibility to ensure that local codes do not require that reservoirs be built in accordance with a pressure vessel code such as EN 13445 or ASME VIII, Division 1.

With this wording, the default is a pipe based reservoir but an ASME certified reservoir is an option.  I hope we will be able to continue this approach in 5th Edition but I’m uncertain about higher pressure reservoirs.  From my past experience, old notes and browsing, here’s what I’ve learned.

ASME Certified Pressure Vessels

ASME certified pressure vessel fabricators undergo a rigorous program to ensure compliance with the rules and regulations of the ASME Boiler and Pressure Vessel code.  For unfired pressure vessels, these requirements are given in ASME VIII, Division 1 (EN 13445).  There are two variations of certification:  “U” stamp and “UM” stamp.

“U”stamped pressure vessels are required to have a 3rd party ASME inspector review and approve the calculations as well as inspect certain stages during manufacture of the reservoir.  This inspector also witnesses the ASME hydrostatic test which, apparently, is now 1.3 x MAWP.  This means that U stamped vessels cannot be manufactured in advance; that is, the U stamped vessel is customized for a particular service, has a serial number and therefore cannot be a stocked item. The fabricator undergoes an ASME inspection every three years.

In contrast to the U stamped vessels, there is a “UM” stamped vessel which is also subject to the same ASME specifications.  However, the “UM” stamped vessel is limited to a maximum of 1.5 cubic feet for a 600 psig rating and 600 psig is the maximum permitted pressure for the UM stamp.  ASME 3rd party inspection is not required; therefore “UM” vessels can be manufactured in advance, they do not have a serial number and they can be stocked as an inventory item.  The UM fabricator is inspected annually by ASME.

Pipe Based Reservoirs

Pipe based reservoirs for API 682 sealing systems must be built entirely of piping components and ASME B31.3, “Process Piping”, (ISO 15649) is the governing standard.  As far as I can tell, ASME B31.3 now requires hydrostatic testing at 1.3 x MAWP.

Mechanical Seals

It should be noted that the mechanical seal is not considered to be part of the pump pressure vessel and therefore does not fall under the pressure vessel rules.  Seal manufacturers have several pressure ratings for their products.  API 682 recognizes a static pressure rating, a dynamic pressure rating and a hydrostatic pressure test rating (see the SealFAQs version of these definitions).  Each seal OEM seems to use a different and proprietary method for determining these pressure limits.


Accessories for Cell Phone Cameras

iPhone 7+ and LED light on Joby Gorillapods

We photographers certainly love our accessories!  Here are some suggestions for accessories to help get the image you want with your cell phone.

Tripod

Although many people prefer not having to deal with a tripod, it is still one of the first and best accessories for photography.   In this discussion, since the subject is cell phone photography, it is implied that the tripod be small and lightweight.  Also needed is a means of attaching the cell phone to the tripod.

One of the Joby Gorillapods seems ideal for cell phone photography.  I’m currently using this one with my iPhone 7+.  To use the cell phone with a more conventional tripod, you’ll need a cell phone mount .

When using the cell phone mounted on a tripod, I prefer to use a 2 second delay to trip the shutter.  This helps to prevent camera/tripod vibration from my touch.  For my iPhone, setting the shutter delay also automatically switches the camera to a 10 shot burst mode – which is not always desirable.  Unfortunately, there is no way to turn off this burst mode; however, a workaround is to turn on the “HDR” mode as well.  With HDR mode, only two shots are taken:  one shot is normal, the other HDR.  Actually, the HDR image is often a good one.

Diffuser and Reflector

A diffuser can soften the light and prevent hot spots when the subject is in bright sunlight.   You can make one with a translucent trash bag taped to a cardboard frame.

A reflector placed on the opposite side of the light source helps distribute the light and reduce shadows.  The reflector can be a piece of copy paper (or bring along a large sheet of foamboard).

Diffusers and reflectors can be difficult to handle – another reason to free up your hands by placing the camera on a tripod.

Backdrop

A backdrop can hide that unwanted background clutter but can be difficult to set up.  A painter’s drop cloth and a few spring clamps can be useful.  For small subjects, the backdrop and reflector can be a sheet of paper.

Lights

A small, inexpensive, battery powered LED light is probably the best way to add light to the scene.    I use one like this with a rechargeable battery (separate purchase); similar ones can be purchased for about $30. With the camera on a tripod, move the light around to find the best angle and distance to light the scene.  Unfortunately, a battery lasts only about an hour.  Add a reflector on the opposite side of the light to balance the lighting.

The original Joby Gorillapod is useful for holding the LED light.

Macro lens

There are a number of macro lenses available for cell phone close-up photography.  Some of these lenses are very powerful; however, getting good lighting can be a problem.  When using a macro lens on a cell phone, the lens will probably be only about an inch from the subject area.  As far as I’m concerned, if you buy a macro lens, you might as well buy a light or two while you’re at it.

Here are some macro lenses that are popular and appear useful:

I recently got the Olloclip kit of macro lenses and am trying to decide whether I like them or not.  I’ll probably get one or two of the less expensive lenses and compare them in a separate blog post.

Coming up

The next post will be about cell phone camera apps.

Using Your Cell Phone Camera

A cartridge seal.

Your cell phone can be useful when documenting equipment failures, repairs, etc.  In fact, most readers have probably already used their cell phones to do so.  With the cell phone, you can dictate notes, record video or take still photographs.  This post is about improving those still photographs.

The advantages of using your cell phone camera to record damaged part information are

  • Always with you
  • More than adequate quality
  • Easy to use
  • Easy to send images to others.

I’m currently using an iPhone 7+ and really appreciate the quality and new features of its camera.  I especially like the telephoto (2x) lens.  Learn to use the features of your cell phone camera.   Here are some tips for getting good images from a cell phone camera without using additional auxiliary equipment:

  • Set focus point yourself, don’t rely on the camera autofocus
  • Zoom in (use 2x dual lens if available)
  • White Balance (color balance for the light source)
  • Adjust exposure manually, don’t rely on camera to set exposure
  • 2 second delay will help to avoid camera movement.

For more detailed information, especially with the iPhone, check out https://iphonephotographyschool.com/iphone-camera-controls/.

Remember that pictures you take will be used to tell the story of the failure or repair.  Be sure to establish the scene with the “big picture”.  Include some shots of components or areas before going too far with extreme close-ups or macros.  For example, in the report, you’ll want to be able to write things like:

  • Here’s the complete cartridge seal when first removed from the pump (the big picture)
  • Here’s the retainer (a component)
  • Notice the fretting inside the retainer (close-up of damage).

Clean up the background.

Remember the saying “90% of photography is moving furniture!” and apply this thought to removing the junk and clutter from the background of your photo.  Use cardboard, shop rags or copy paper for a background or to hide the clutter.

Fill the Frame

Move the camera in close and/or use the dual lens so that the screen is filled with the subject image.  This will save editing/cropping time and also produce a better image.  By filling the frame, you also allow for extracting a “macro” during editing.

Macros

Although macro lenses are available for cell phone cameras, those will be discussed in the next blog.  Most of the necessary documentation photos will not be macros or even close-ups but the camera can be moved very close to the subject to record details.   In post processing (editing) you can crop and zoom in for a “macro” image of details.

Don’t use the flash

The cell phone flash will produce hot spots on the image; turn the flash off and try to find good lighting.   Indirect light near a door or window can be very helpful.  If possible, move the parts outdoors on a cloudy day.

Select the best images

Get many pictures from different angles and distances, then select and use only the best ones.

Coming up

So far, the discussion has not included auxiliary equipment such as tripods, lenses and lighting.  Auxiliary equipment will be discussed in the next blog.


Documenting Repairs with a Cell Phone

iPhone for documentatio
Simple setup using cell phone for documentation

Photography has been a hobby of mine for many years.  My first engineering job was at Texas Eastman Company in Longview, Texas in 1970.  Texas Eastman was in the chemicals division of Eastman Kodak and the company sponsored a photography club.  The club had cameras for rent, studios, and darkrooms for making prints.  The more experienced club members taught classes in photography.  I quickly became hooked and bought a 35mm single lens reflex camera to replace my little point and shoot Instamatic.

In those days, getting a photo of a mechanical part meant using the company photographer.  Typically, the photo would be a black and white print or perhaps a color slide.  There really was no good way to attach a photo to a report.  One or two people might get a copy of the print and another print went into a file.

The first photo of a broken part that I personally requested was of a broken shaft.  The camera used was a Hasselblad – a medium format camera.  This camera was primarily used to get publicity photos of people and events for the company newsletter.  Although the print of the broken shaft came out quite well, getting it was a very big deal.  I couldn’t help but think that I could have got the same photo with my 35mm camera and the process would have been much simpler.

As the years passed, for purposes of making presentations (which meant 35mm slides in those days), I began to take pictures of products and failures.  This was not an easy task.  Getting the lighting right was not simple.  My personal 35mm camera would not focus close enough so I got a simple “extender”.  There was no “editing” of the 35mm slides so I bracketed exposures.  The results were not very good.

More years passed and I tried a very basic digital camera having ¾ megapixel resolution.  Although it was OK for snapshots of friends, it was not very good for recording the condition of broken parts.

The next camera upgrade was very significant.  We (meaning the company) bought a 3 megapixel Nikon 990 digital camera.  At first, I thought it was wonderful.  I could even attach it to a microscope.  But after a couple of years, I had to admit that the quality (meaning resolution) just wasn’t very good.  On the other hand, the entire technology of writing a report had changed and it was relatively simple to add a digital image to a report and print it – or simply email the report.

I needed/wanted a better camera so I personally bought a Canon Powershot and used it (and a few upgrades) for many years to get images of products, new parts and broken parts.  I had learned a bit about lighting along the way so my images had improved.

Before too long, cameras were incorporated into cell phones and salesmen as well as end users began to send me digital images.  Frankly, most of these early cell phone images were terrible; however, I greatly appreciated the additional information at the time.   Fortunately, cell phone cameras have improved tremendously and that is the real reason for this blog.

Today, you can provide more than adequate information about a broken part by just using your cell phone camera.  In fact, there are many advantages to using your cell phone camera for this task.  But this post is already long so I’ll expound a bit more in the next blog.

Wikipedia: End Face Mechanical Seals

Wikipedia, the free online encyclopedia, has a page about mechanical seals:  “End Face Mechanical Seals”.  The “End Face” term is to distinguish the “mechanical seals” that are featured in SealFAQs from the many other types of seals and mechanical seals that are also on Wikipedia.

The Wikipedia page on end face mechanical seals is a pretty good one – I know because I wrote much of it. In fact, some years ago, I edited the page and convinced other editors to use the term “end face mechanical seals”.  Of course, Wikipedia is a collaborative effort and anyone can edit Wikipedia articles so much of my previous revisions had disappeared – just as my current revisions will also disappear over time.

This time around, my edits were largely to make the Wikipedia article consistent with API 682. Therefore, I insisted that an end face mechanical seal is comprised of five components:

  • Seal ring
  • Mating ring
  • Secondary sealing elements
  • Springs
  • Hardware

whereas the previous article had listed only four components by virtue of grouping the seal ring and mating ring into “primary sealing surfaces”. This combining has happened in the past and will probably happen again.  Obviously someone believes strongly in grouping the seal ring and mating ring.

I also added a very brief overview of seal piping plans, expanded the section on origins and development of mechanical seals and provided a list of references – including a link to SealFAQs.

At this point in time, the Wikipedia page on End Face Mechanical Seals is in sync with SealFAQs but you can be sure that will change in the future.


The Background of SealFAQs

Shortly after learning what a mechanical seal was, and as I learned more, I began to think about writing a book on mechanical seals. At the time (early 1970s) there just didn’t seem to be much information available on the engineering aspects of mechanical seals.  I collected what information I could and, over the years, began to organize my book.  Over those same years, more and more information about mechanical seals became available – plus I found many books and articles that had been previously overlooked.

By the time I retired from John Crane Inc. at the end of 2014, there almost didn’t appear to be a need for my book on mechanical seals.  In particular, Dr. A. O. Lebeck’s book, Principles and Design of Mechanical Face Seals, is so comprehensive that there was little need for my own thoughts on mechanical seal theory.  Still, I reviewed my past publications and paper files and made plans for my own book.  It was a daunting task.  Who would publish my book?  Who would buy it?

I considered self-publishing. I had some experience with Blurb (shameless plug here for my dad’s memoirs and my own book of photographs) but then remembered that I had never received even one single dollar from Blurb.  Making money from my book on seals was not my primary objective but would have been nice.  I also considered Amazon self-publishing for a digital version of my seals book.  An Amazon ebook had considerable appeal but as I learned more, this publishing format seemed limiting, especially considering the many equations, graphs and illustrations that my book would have.  I became frustrated with the whole idea.

My frustration (and realization that there was no money to be made) inspired me to consider making a website about mechanical seals. After all, some of my friends and co-workers have been telling me for years that mechanical seals were actually a hobby for me.  I began to consider my options for making a website.  Actually, I already had a blog about my Buck family genealogy so I knew a little about making a site.  After a little research, I decided to use WordPress to develop my site and BlueHost to host the site.  I came up with the name “SealFAQs” as meaningful and unclaimed.  I outlined my site and jumped right into developing it.

My first efforts with SealFAQs were so frustrating and the results so bad that I temporarily gave up. Instead, I started a simple blog in order to learn and practice WordPress.  After a few months, I returned to working on SealFAQs in 2017.

SealFAQs is far from complete but I’ve decided to “launch” it now and continue to develop it. As a result, some (not too many though) of the site pages are blank – just a place marker.  However, these pages will be filled out in the coming months.  Also, other pages might look a bit rough but are useable and will be tidied up eventually.

Fortunately, I’ve already published so much about mechanical seals that there is a wealth of material already in the public domain from which to draw. I hope that SealFAQs will be a useful site and that you will visit it frequently.