Macro Lenses for Cell Phone Photography

Strictly speaking, the lenses I’m about to show and discuss are not true “macro” lenses.  In macro photography, the subject is projected in full size or larger on the negative or sensor.  Cell phone camera sensors are tiny — about 6mm diagonally – which means that only tiny subjects could be photographed as true macros.  In modern usage, “macro” has come to mean an extreme close-up such that the final image is the same size or larger than the subject.

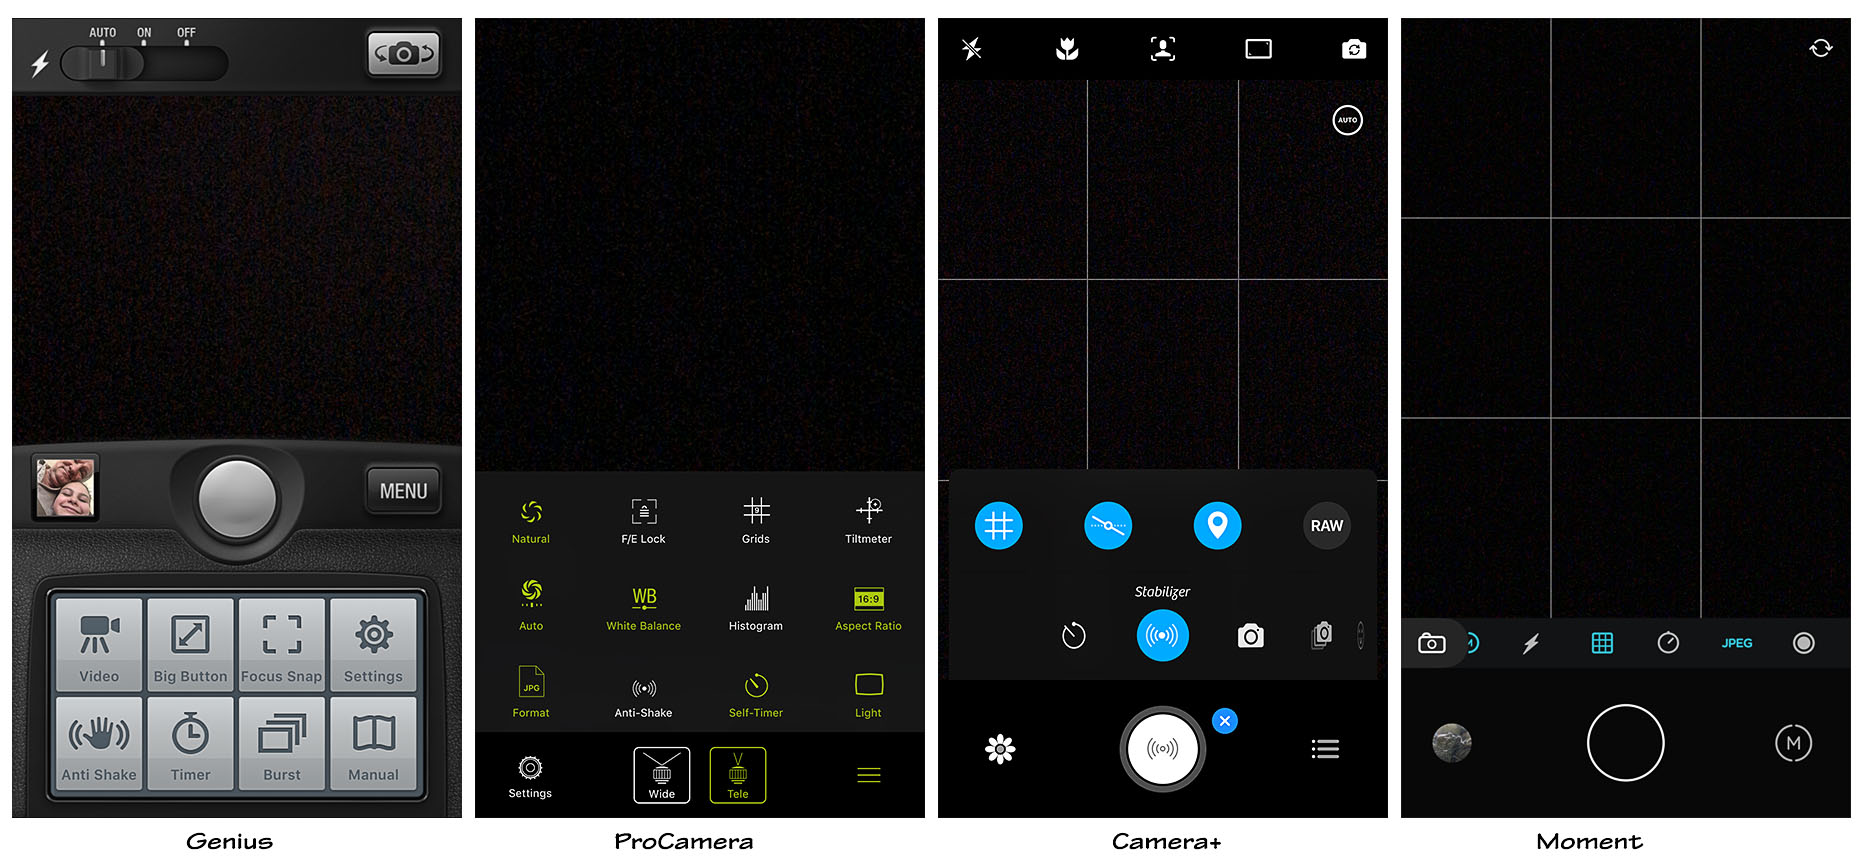
I was able to do quick tests for the following lenses:

Macro lenses for cell phone cameras.

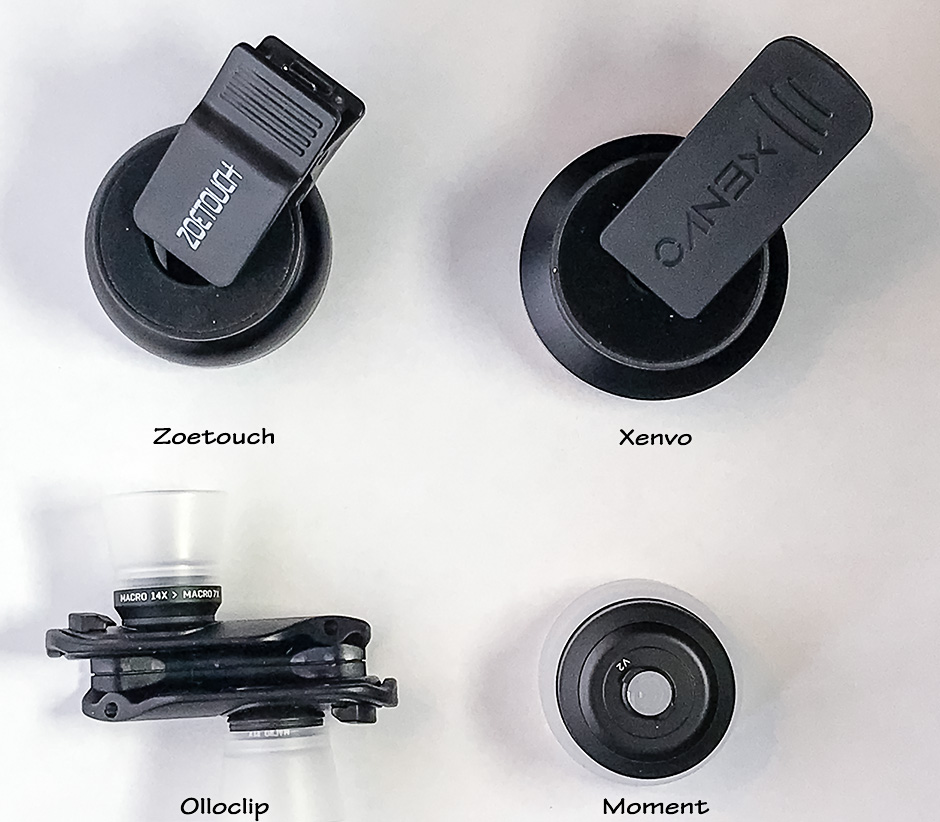
The Zoetouch and Xenvo are simple clip-on lenses that also include a wide angle lenses.  With my iPhone 7+, I had to be careful getting the lens over the 1x or 2x lens of the phone camera.

The Olloclip is a kit that includes 7x, 14x and 21x lenses.  The 14x macro is obtained by screwing a second lens onto the 7x lens.  The lenses are screwed into a holder which then snaps onto the clip.  The kit includes two translucent lens hoods which are a great help in obtaining a steady focus. The holder and clip for the iPhone 7+ can be configured to fit either the 1x or 2x lens of the phone camera.  The Olloclip works fairly well except that the Camera+ or ProCamera app are required in order to use the 2x lens of the iPhone 7+ with it.

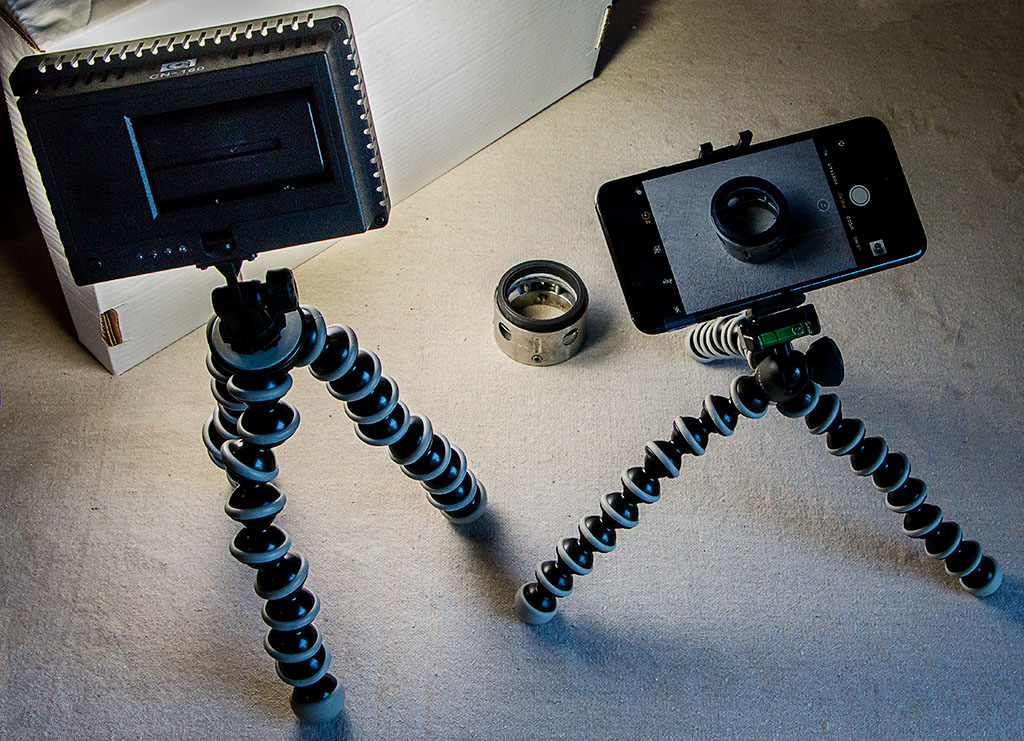
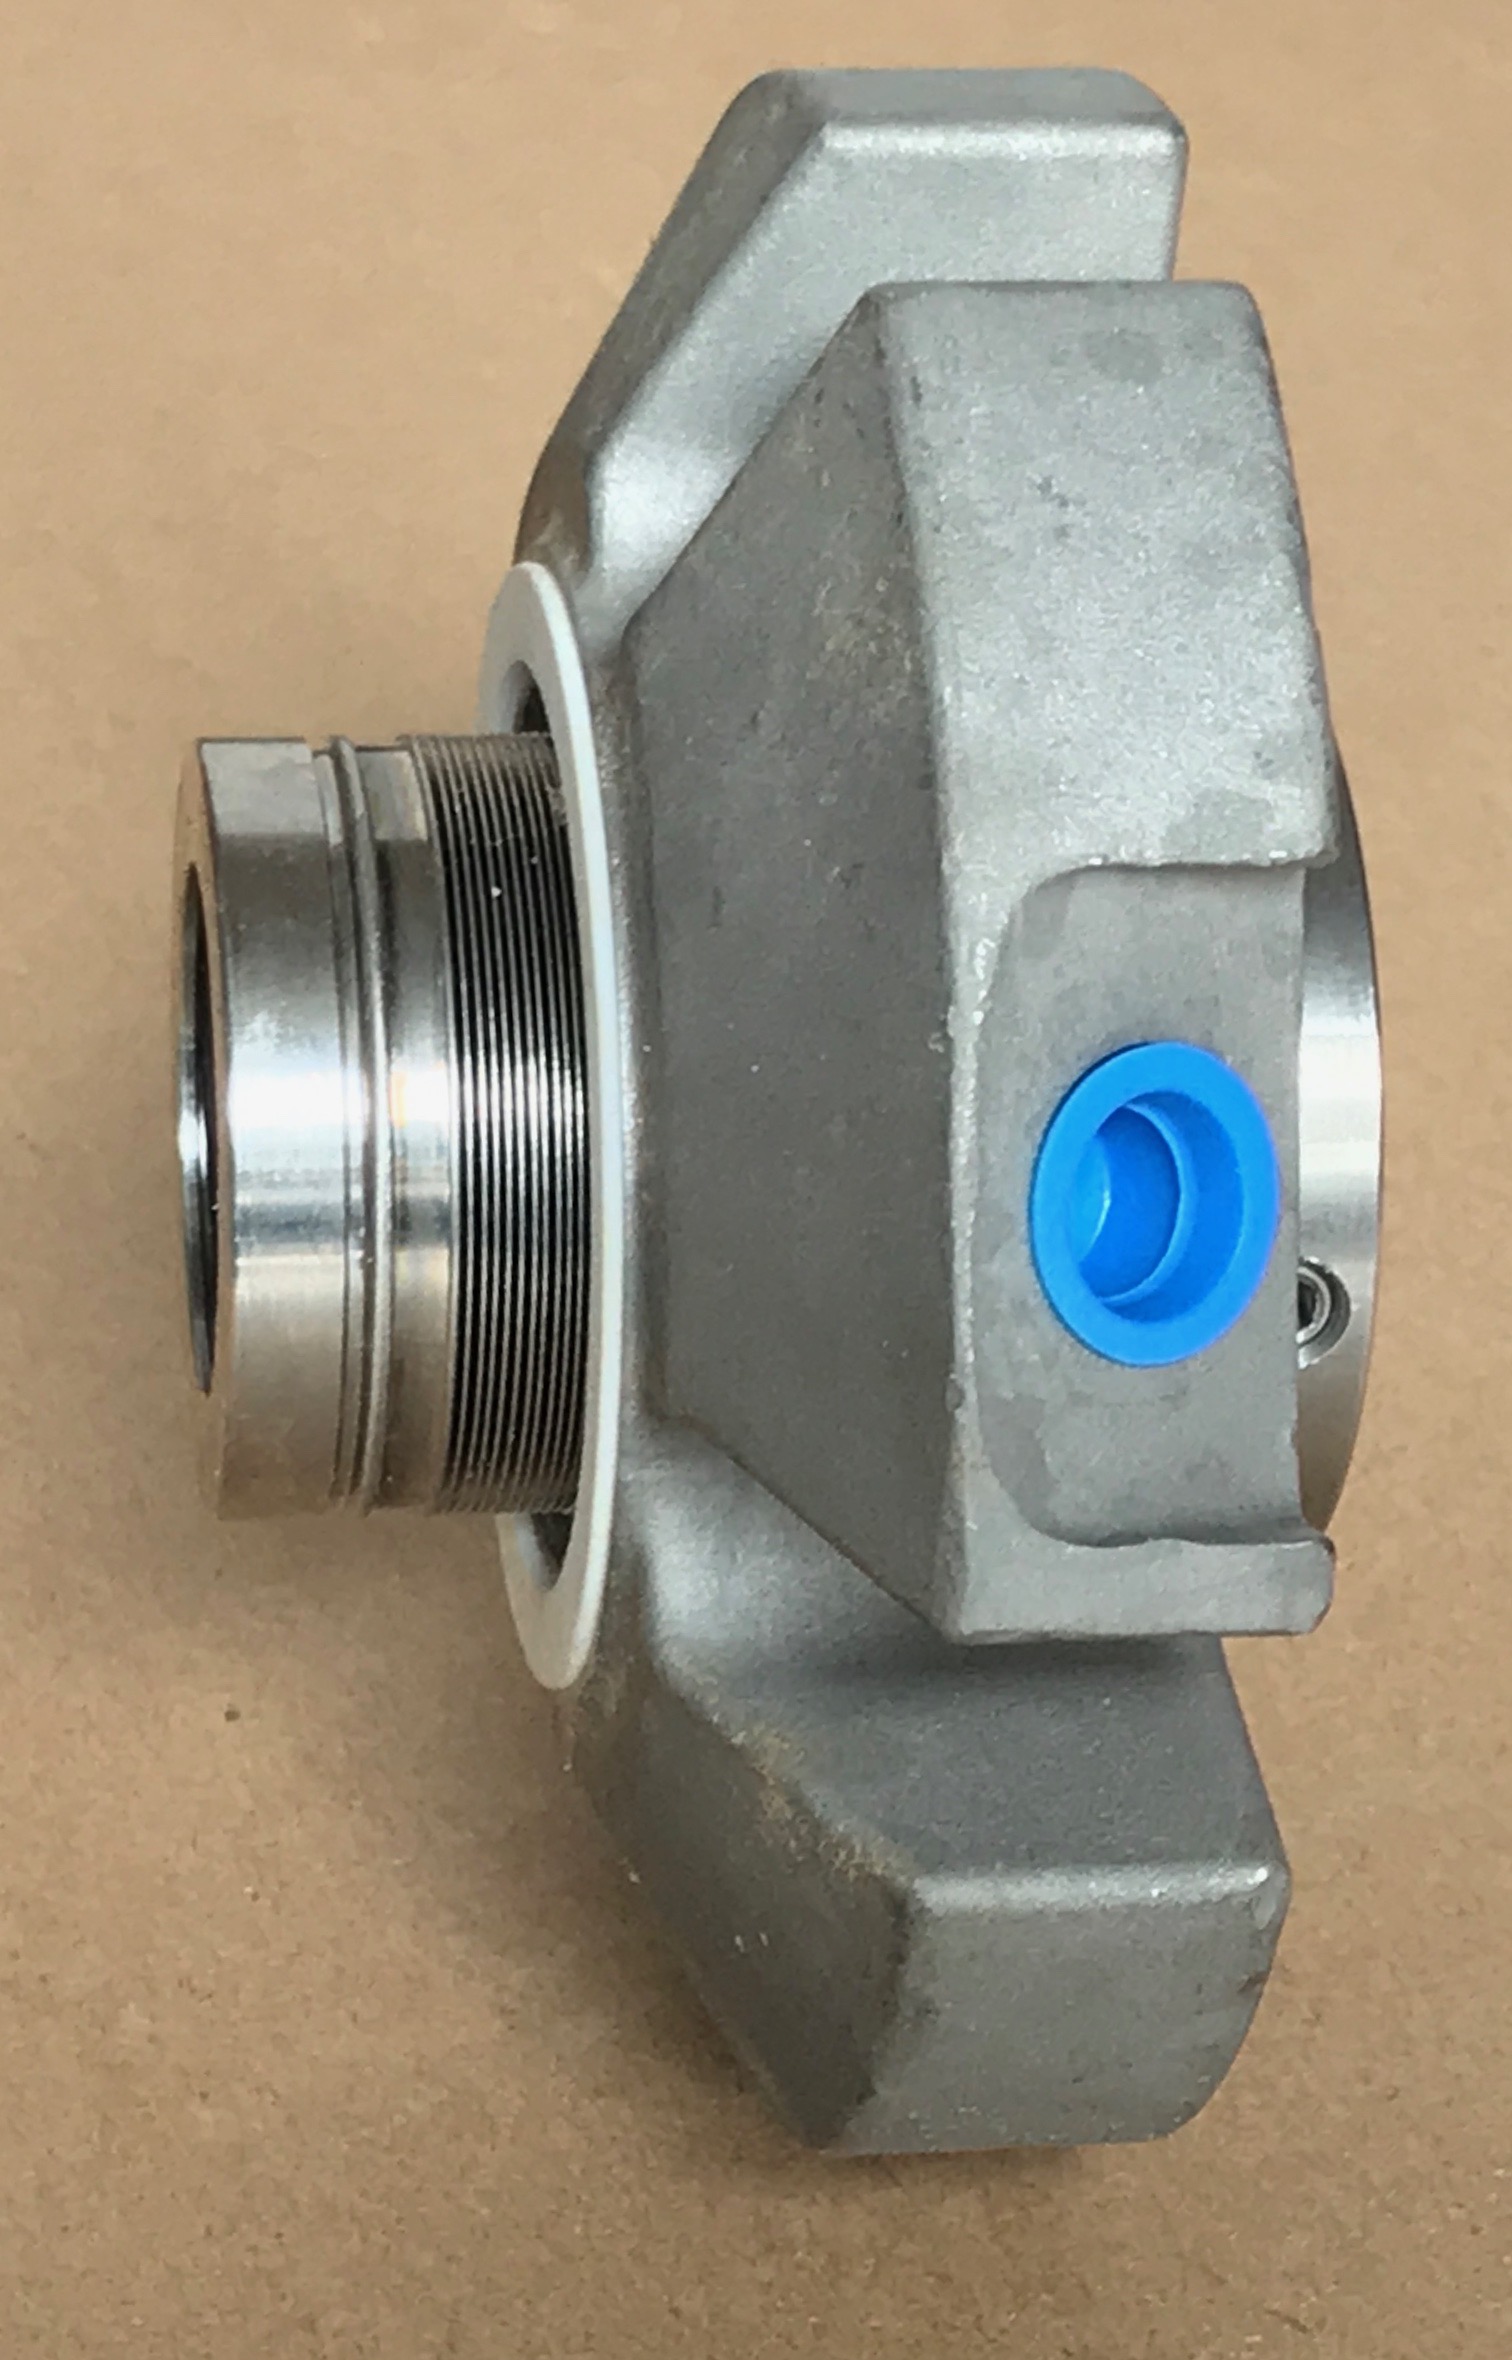
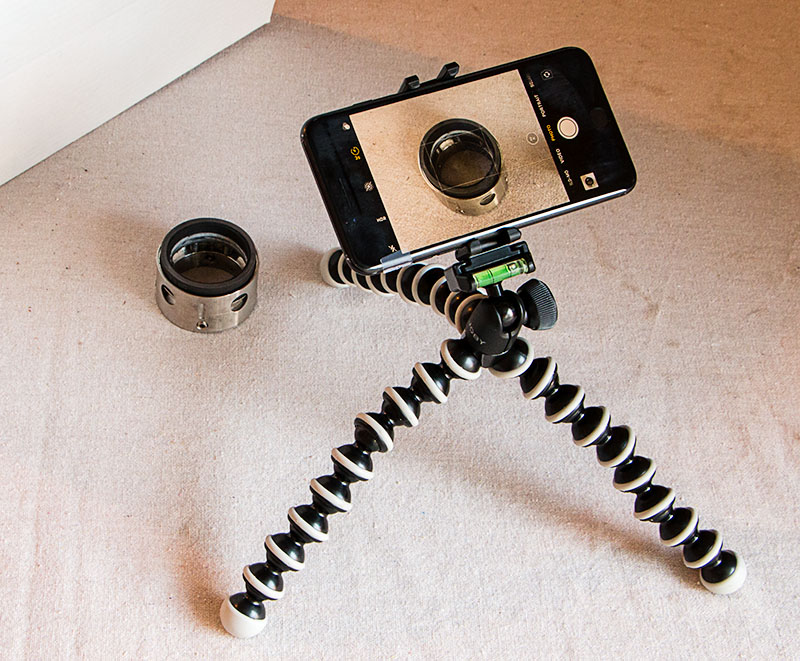
The Moment macro lens is a 10x lens.  Apparently, the original version of the lens used a clip mount whereas Version 2 requires a special case from Moment.  Optics are identical for Version 1 and Version 2.  I got Version 2 and the Moment case ($30).  The Moment case is very thin and easily fit inside my iPhone holster.  The Moment lens is easily attached to the case and fits over either the 1x or 2x lens of the iPhone 7+.  Like the Olloclip, the Camera+ or ProCamera app are required in order to use the 2x lens of the iPhone 7+; however, Moment offers a free app that is very simple to use and works well with the Moment macro lens.  I really like the Moment system and have ordered their telephoto and wide angle lenses as well.

Here are images obtained from photographing a penny using the various macro lenses.   I tried to make each image as large as possible by placing the iPhone 7+ as close as possible to the penny.  Each individual  image was then copied to a blank Photoshop page so the combination below is approximately to scale.

Macro photos of a penny using add-on macro lenses with an iPhone 7+.(click for larger view).

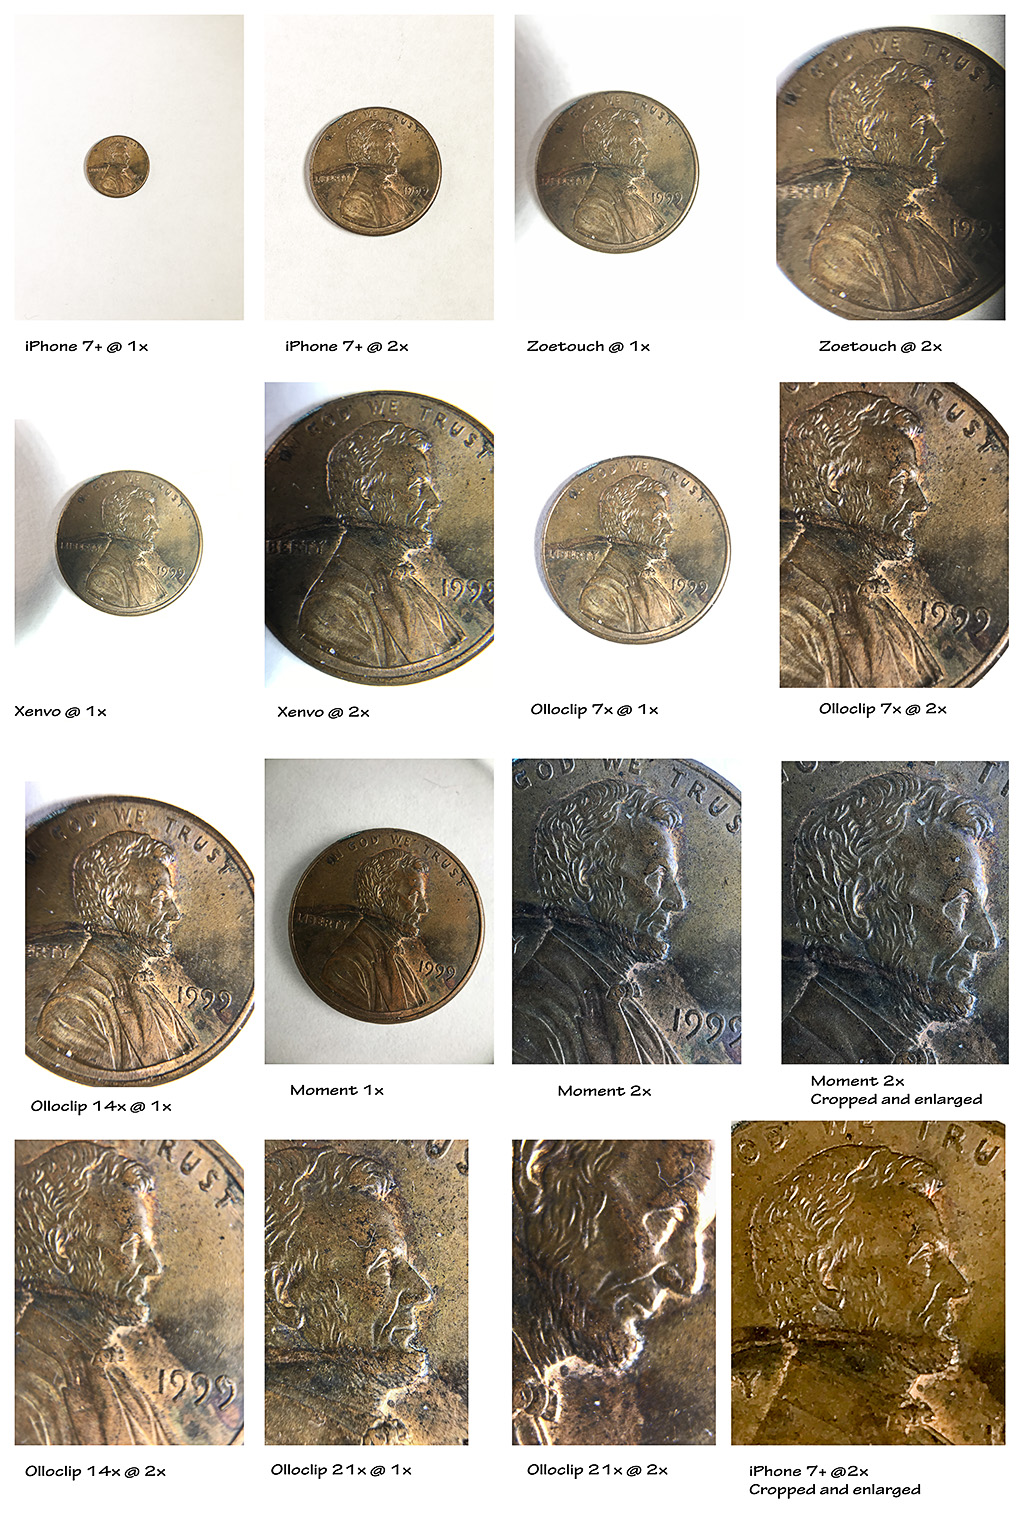
As noted previously, there is a space of only an inch or so between the lens and subject so lighting is not easy.  For these images, I placed a small LED video light to the right of the penny and a sheet of white paper on the left side.

I’m not going to comment on every image but a few observations are in order:

  • The Zoetouch and Xenvo lenses were difficult to hold steady and obtain focus.
  • The Moment system obviously missed the white balance when only the penny was in view.
  • The Moment lens seemed to have the best optics.
  • The Olloclip 21x lens mounted over the iPhone 7+ 2x lens provided the most enlargement and was also the most difficult to use.
  • Simple enlargement and cropping can give good results.

My preference?  I’ll be using the Moment system but also having the Olloclip kit available.  I’m still tinkering with lighting though.


Wikipedia Gripes

We interrupt the series on cell phone documentation to gripe about Wikipedia …

Previously, I posted about editing the end face mechanical seals article on Wikipedia.   Those edits are still holding as written.  However, the editors at Wikipedia did not like my link back to this site so it has been removed.  They said that SealFAQs was a self published blog and therefore a conflict of interest.  They also removed links to SealFAQs that I’d placed in a few other articles.  Surprisingly, they allowed a link to a commercial seal distributor!

Not my day at Wikipedia.  Unrelated to mechanical seals, I had created an article about my great, great, great grandfather, William Calmes Buck who was a noted Baptist preacher in the 1800s.  My submission was declined on the basis that, as a relative, I had a conflict of interest.    They also did not like that I used his memoirs as a major reference.  The article is still on Wikipedia but as a draft.  I’ve appealed and am modifying the references as requested but expect it will not be acceptable.

Oh well.

… and now we return to cell phone photography.


Camera Apps for Cell Phones

Although the built-in camera of a cell phone is adequate, there are apps available which can provide extensions or even new features.  On my iPhone 7+, I currently have four photo apps for the camera and editing:

  • Camera Genius
  • ProCamera
  • Camera+
  • Moment.

Here are screenshots of the menus of those apps.

Camera Apps
Apps for cell phone photography

In planning this post, my intention was to prepare a table of available features and options for each of the apps.  However, as I began to make the table, I realized that many of the apps had the same features so here’s an overview of each app.

Camera Genius

Camera Genius costs $2.99.  The current version is 4.8.  It has 6 ratings with an average of 3.8 out of 5.  In addition to the camera features, Camera Genius includes a video mode and can do simple editing.   Controls and operation are very simple.  Camera Genius does not include RAW mode, HDR, adjustable white balance or allow for switching between the 1x and 2x lenses on my iPhone 7+.  I’ve rarely used it.

Procamera

Procamera costs $4.99.  The current version is 11.2 and it has 139 ratings with an average of 4.2 out of 5.  In addition to the camera features, Procamera includes a video mode and can do editing.   Although it may seem a little intimidating, Procamera seems to include everything you might imagine including RAW mode, HDR, adjustable white balance and support for dual lenses.  This is the app that I use.

Camera+

Camera+ costs $2.99.  The current version is 10.10.12 and it has 1100 ratings with an average of 4.4 out of 5.  In addition to the camera features, Camera+ includes a video mode and can do editing.   The editing features are extensive including “clarity”.  Camera+ supports RAW mode, HDR, and adjustable white balance.  I really liked the Camera+ implementation of white balance.  Although Camera+ claims to support the dual lenses of the iPhone 7, lens selection is very non-intuitive and, for too long a time, I could not do it.

Moment

The Moment app is free; it was developed primarily to support the Moment auxiliary lenses (which I just bought and will report on later) but works without the add-on lenses as well.  The current version is 2.7.7; it has 31 ratings with an average of 3.4 out of 5.    Controls and operation are very simple.  The Moment app does include RAW mode and manually adjustable white balance but not HDR.  It is simple to switch between the 1x and 2x lenses of my iPhone 7+.  In addition to the camera features, the Moment app includes a video mode; however, it cannot do editing.

What do I do?

Typically, when using the iPhone camera to grab a snapshot, I also use the built-in app.  But when trying something a bit different or difficult, I use the Procamera app to tweak the settings a bit.  Camera+ and Camera Genius have been moved to the back page of my iPhone apps.  Jumping ahead a bit, the Moment lenses are very good and using them is simple with either Procamera or Moment apps – and the Moment app is simpler.  I very much prefer to do my editing in the full computer version of Photoshop.

The next blog post will be about macro lenses.


Accessories for Cell Phone Cameras

iPhone 7+ and LED light on Joby Gorillapods

We photographers certainly love our accessories!  Here are some suggestions for accessories to help get the image you want with your cell phone.

Tripod

Although many people prefer not having to deal with a tripod, it is still one of the first and best accessories for photography.   In this discussion, since the subject is cell phone photography, it is implied that the tripod be small and lightweight.  Also needed is a means of attaching the cell phone to the tripod.

One of the Joby Gorillapods seems ideal for cell phone photography.  I’m currently using this one with my iPhone 7+.  To use the cell phone with a more conventional tripod, you’ll need a cell phone mount .

When using the cell phone mounted on a tripod, I prefer to use a 2 second delay to trip the shutter.  This helps to prevent camera/tripod vibration from my touch.  For my iPhone, setting the shutter delay also automatically switches the camera to a 10 shot burst mode – which is not always desirable.  Unfortunately, there is no way to turn off this burst mode; however, a workaround is to turn on the “HDR” mode as well.  With HDR mode, only two shots are taken:  one shot is normal, the other HDR.  Actually, the HDR image is often a good one.

Diffuser and Reflector

A diffuser can soften the light and prevent hot spots when the subject is in bright sunlight.   You can make one with a translucent trash bag taped to a cardboard frame.

A reflector placed on the opposite side of the light source helps distribute the light and reduce shadows.  The reflector can be a piece of copy paper (or bring along a large sheet of foamboard).

Diffusers and reflectors can be difficult to handle – another reason to free up your hands by placing the camera on a tripod.

Backdrop

A backdrop can hide that unwanted background clutter but can be difficult to set up.  A painter’s drop cloth and a few spring clamps can be useful.  For small subjects, the backdrop and reflector can be a sheet of paper.

Lights

A small, inexpensive, battery powered LED light is probably the best way to add light to the scene.    I use one like this with a rechargeable battery (separate purchase); similar ones can be purchased for about $30. With the camera on a tripod, move the light around to find the best angle and distance to light the scene.  Unfortunately, a battery lasts only about an hour.  Add a reflector on the opposite side of the light to balance the lighting.

The original Joby Gorillapod is useful for holding the LED light.

Macro lens

There are a number of macro lenses available for cell phone close-up photography.  Some of these lenses are very powerful; however, getting good lighting can be a problem.  When using a macro lens on a cell phone, the lens will probably be only about an inch from the subject area.  As far as I’m concerned, if you buy a macro lens, you might as well buy a light or two while you’re at it.

Here are some macro lenses that are popular and appear useful:

I recently got the Olloclip kit of macro lenses and am trying to decide whether I like them or not.  I’ll probably get one or two of the less expensive lenses and compare them in a separate blog post.

Coming up

The next post will be about cell phone camera apps.

Using Your Cell Phone Camera

A cartridge seal.

Your cell phone can be useful when documenting equipment failures, repairs, etc.  In fact, most readers have probably already used their cell phones to do so.  With the cell phone, you can dictate notes, record video or take still photographs.  This post is about improving those still photographs.

The advantages of using your cell phone camera to record damaged part information are

  • Always with you
  • More than adequate quality
  • Easy to use
  • Easy to send images to others.

I’m currently using an iPhone 7+ and really appreciate the quality and new features of its camera.  I especially like the telephoto (2x) lens.  Learn to use the features of your cell phone camera.   Here are some tips for getting good images from a cell phone camera without using additional auxiliary equipment:

  • Set focus point yourself, don’t rely on the camera autofocus
  • Zoom in (use 2x dual lens if available)
  • White Balance (color balance for the light source)
  • Adjust exposure manually, don’t rely on camera to set exposure
  • 2 second delay will help to avoid camera movement.

For more detailed information, especially with the iPhone, check out https://iphonephotographyschool.com/iphone-camera-controls/.

Remember that pictures you take will be used to tell the story of the failure or repair.  Be sure to establish the scene with the “big picture”.  Include some shots of components or areas before going too far with extreme close-ups or macros.  For example, in the report, you’ll want to be able to write things like:

  • Here’s the complete cartridge seal when first removed from the pump (the big picture)
  • Here’s the retainer (a component)
  • Notice the fretting inside the retainer (close-up of damage).

Clean up the background.

Remember the saying “90% of photography is moving furniture!” and apply this thought to removing the junk and clutter from the background of your photo.  Use cardboard, shop rags or copy paper for a background or to hide the clutter.

Fill the Frame

Move the camera in close and/or use the dual lens so that the screen is filled with the subject image.  This will save editing/cropping time and also produce a better image.  By filling the frame, you also allow for extracting a “macro” during editing.

Macros

Although macro lenses are available for cell phone cameras, those will be discussed in the next blog.  Most of the necessary documentation photos will not be macros or even close-ups but the camera can be moved very close to the subject to record details.   In post processing (editing) you can crop and zoom in for a “macro” image of details.

Don’t use the flash

The cell phone flash will produce hot spots on the image; turn the flash off and try to find good lighting.   Indirect light near a door or window can be very helpful.  If possible, move the parts outdoors on a cloudy day.

Select the best images

Get many pictures from different angles and distances, then select and use only the best ones.

Coming up

So far, the discussion has not included auxiliary equipment such as tripods, lenses and lighting.  Auxiliary equipment will be discussed in the next blog.


Documenting Repairs with a Cell Phone

iPhone for documentatio
Simple setup using cell phone for documentation

Photography has been a hobby of mine for many years.  My first engineering job was at Texas Eastman Company in Longview, Texas in 1970.  Texas Eastman was in the chemicals division of Eastman Kodak and the company sponsored a photography club.  The club had cameras for rent, studios, and darkrooms for making prints.  The more experienced club members taught classes in photography.  I quickly became hooked and bought a 35mm single lens reflex camera to replace my little point and shoot Instamatic.

In those days, getting a photo of a mechanical part meant using the company photographer.  Typically, the photo would be a black and white print or perhaps a color slide.  There really was no good way to attach a photo to a report.  One or two people might get a copy of the print and another print went into a file.

The first photo of a broken part that I personally requested was of a broken shaft.  The camera used was a Hasselblad – a medium format camera.  This camera was primarily used to get publicity photos of people and events for the company newsletter.  Although the print of the broken shaft came out quite well, getting it was a very big deal.  I couldn’t help but think that I could have got the same photo with my 35mm camera and the process would have been much simpler.

As the years passed, for purposes of making presentations (which meant 35mm slides in those days), I began to take pictures of products and failures.  This was not an easy task.  Getting the lighting right was not simple.  My personal 35mm camera would not focus close enough so I got a simple “extender”.  There was no “editing” of the 35mm slides so I bracketed exposures.  The results were not very good.

More years passed and I tried a very basic digital camera having ¾ megapixel resolution.  Although it was OK for snapshots of friends, it was not very good for recording the condition of broken parts.

The next camera upgrade was very significant.  We (meaning the company) bought a 3 megapixel Nikon 990 digital camera.  At first, I thought it was wonderful.  I could even attach it to a microscope.  But after a couple of years, I had to admit that the quality (meaning resolution) just wasn’t very good.  On the other hand, the entire technology of writing a report had changed and it was relatively simple to add a digital image to a report and print it – or simply email the report.

I needed/wanted a better camera so I personally bought a Canon Powershot and used it (and a few upgrades) for many years to get images of products, new parts and broken parts.  I had learned a bit about lighting along the way so my images had improved.

Before too long, cameras were incorporated into cell phones and salesmen as well as end users began to send me digital images.  Frankly, most of these early cell phone images were terrible; however, I greatly appreciated the additional information at the time.   Fortunately, cell phone cameras have improved tremendously and that is the real reason for this blog.

Today, you can provide more than adequate information about a broken part by just using your cell phone camera.  In fact, there are many advantages to using your cell phone camera for this task.  But this post is already long so I’ll expound a bit more in the next blog.

Wikipedia: API Standard 682

Although Wikipedia, the online encyclopedia, has a page for the American Petroleum Institute (API), it does not have a page for the seal standard API 682.  I’ve created a new page “API Standard 682” and written an encyclopedic type description.  Because this is a new page, it must be approved and I was told that approval might take several months because of the large backlog of new pages (2415 pending submissions!) waiting for approval.  In the meantime, the draft page can be accessed by searching for “Draft: API Standard 682” or by going directly to https://en.wikipedia.org/wiki/Draft:API_Standard_682.  The draft article can even be edited if you wish to revise or add to it.

The draft article on API 682 does not contain nearly enough detail to replace the complete standard and is not intended to do so. Instead, the draft article builds up to the content of 4th Edition by providing the background and development of previous editions.  The draft article includes the Table of Contents for 4th edition and a brief descriptions of piping plans.

Whereas the terms “tandem” and “double” were used in the more general “End Face Mechanical Seals” article, I used the terms “Arrangement 2” and “Arrangement 3” in the API 682 article.

At this point in time, the Wikipedia draft page on API Standard 682 is in sync with SealFAQs but you can be sure that will change in the future.

Wikipedia: End Face Mechanical Seals

Wikipedia, the free online encyclopedia, has a page about mechanical seals:  “End Face Mechanical Seals”.  The “End Face” term is to distinguish the “mechanical seals” that are featured in SealFAQs from the many other types of seals and mechanical seals that are also on Wikipedia.

The Wikipedia page on end face mechanical seals is a pretty good one – I know because I wrote much of it. In fact, some years ago, I edited the page and convinced other editors to use the term “end face mechanical seals”.  Of course, Wikipedia is a collaborative effort and anyone can edit Wikipedia articles so much of my previous revisions had disappeared – just as my current revisions will also disappear over time.

This time around, my edits were largely to make the Wikipedia article consistent with API 682. Therefore, I insisted that an end face mechanical seal is comprised of five components:

  • Seal ring
  • Mating ring
  • Secondary sealing elements
  • Springs
  • Hardware

whereas the previous article had listed only four components by virtue of grouping the seal ring and mating ring into “primary sealing surfaces”. This combining has happened in the past and will probably happen again.  Obviously someone believes strongly in grouping the seal ring and mating ring.

I also added a very brief overview of seal piping plans, expanded the section on origins and development of mechanical seals and provided a list of references – including a link to SealFAQs.

At this point in time, the Wikipedia page on End Face Mechanical Seals is in sync with SealFAQs but you can be sure that will change in the future.


The Background of SealFAQs

Shortly after learning what a mechanical seal was, and as I learned more, I began to think about writing a book on mechanical seals. At the time (early 1970s) there just didn’t seem to be much information available on the engineering aspects of mechanical seals.  I collected what information I could and, over the years, began to organize my book.  Over those same years, more and more information about mechanical seals became available – plus I found many books and articles that had been previously overlooked.

By the time I retired from John Crane Inc. at the end of 2014, there almost didn’t appear to be a need for my book on mechanical seals.  In particular, Dr. A. O. Lebeck’s book, Principles and Design of Mechanical Face Seals, is so comprehensive that there was little need for my own thoughts on mechanical seal theory.  Still, I reviewed my past publications and paper files and made plans for my own book.  It was a daunting task.  Who would publish my book?  Who would buy it?

I considered self-publishing. I had some experience with Blurb (shameless plug here for my dad’s memoirs and my own book of photographs) but then remembered that I had never received even one single dollar from Blurb.  Making money from my book on seals was not my primary objective but would have been nice.  I also considered Amazon self-publishing for a digital version of my seals book.  An Amazon ebook had considerable appeal but as I learned more, this publishing format seemed limiting, especially considering the many equations, graphs and illustrations that my book would have.  I became frustrated with the whole idea.

My frustration (and realization that there was no money to be made) inspired me to consider making a website about mechanical seals. After all, some of my friends and co-workers have been telling me for years that mechanical seals were actually a hobby for me.  I began to consider my options for making a website.  Actually, I already had a blog about my Buck family genealogy so I knew a little about making a site.  After a little research, I decided to use WordPress to develop my site and BlueHost to host the site.  I came up with the name “SealFAQs” as meaningful and unclaimed.  I outlined my site and jumped right into developing it.

My first efforts with SealFAQs were so frustrating and the results so bad that I temporarily gave up. Instead, I started a simple blog in order to learn and practice WordPress.  After a few months, I returned to working on SealFAQs in 2017.

SealFAQs is far from complete but I’ve decided to “launch” it now and continue to develop it. As a result, some (not too many though) of the site pages are blank – just a place marker.  However, these pages will be filled out in the coming months.  Also, other pages might look a bit rough but are useable and will be tidied up eventually.

Fortunately, I’ve already published so much about mechanical seals that there is a wealth of material already in the public domain from which to draw. I hope that SealFAQs will be a useful site and that you will visit it frequently.